Dryer Heat Keeper: Pump the Heat Back into Your House, Save Money on Bills!

EDIT: People keep telling me I may wind up with some significant mold issues in the near future doing this, so, I’ll warn you that “your mileage may vary” and I’ll have to keep tweaking when I flip the vent open (probably need to wait much longer than 10 minutes for sure) so that I minimize moisture output as I have had times where it was ridiculous. Also, I’ve seen some mention that this could cause a fire hazard, though, I don’t see how it’s any worse than any other dryer duct so long as you keep the lint down. Last, one commenter said NEVER to do this on a gas dryer as this could be dangerous due to CO2 fumes. I don’t have a gas dryer and have never owned one so I am ignorant of the subject. PLEASE do your research before attempting this install on your dryer!

A week or so ago I posted a video titled Save Money On Your Heating Bill for Less Than $15! which featured a simple device that you can install in the vent duct between your clothes dryer and the outside vent.

I was so excited about saving money on my heating bill that I jumped at the chance and impulse-bought this Dundas Heat Keeper Kit. It happened to show up the next day and I was about to install it when I immediately realized it wasn’t going to work THAT easily because I needed to purchase two dryer vent ducts. All these vent ducts do is connect your dryer to the duct that goes outside the house.

Anyway, I went with two five foot long ducts so that I could extend from the bottom of the dryer (where the duct outlet is) up to above the dryer where I connect it to the Dundas Heat Keeper Kit and then back down to the floor again where it connects to the outside duct. If you’ve ever messed with dryer ducts you’ll understand. I needed two because my dryer happened to connect directly to the outside duct, you, however, may be able to get away with only one additional dryer vent duct depending on what you have in your home already… pull the dryer out and look.

The setup is really simple: connect a vent duct from the dryer to the heat keeper and then connect the other end of the heat keeper using the second vent duct to the outside vent. They provided two “clamps” that were nothing more than large zip ties for connecting the dryer ducts to the heat keeper which worked well enough but I wouldn’t have called them clamps. I also had to purchase two additional 4″ metal duct clamps as well but you may not need to. Here’s what it looks like when completed:
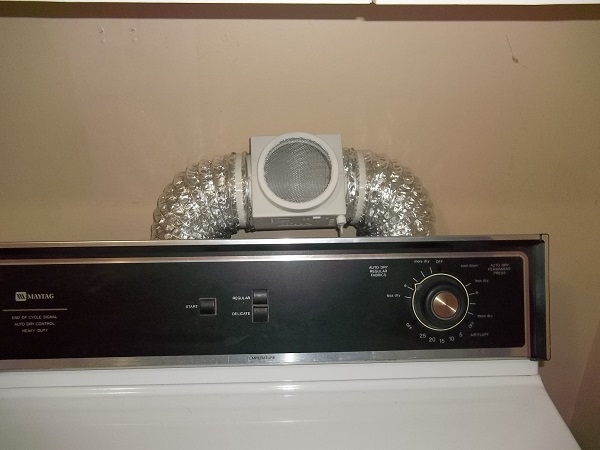
dryer-heat-keeper-1I briefly thought about velcroing it to the cabinet above but I figured it rested well enough atop the dryer and “the boss” didn’t complain other than to say after the first time I used it “It’s not very warm!” But, in my defense, I just started using it. Later on it warmed up. Speaking of which, I also immediately turned the laundry room into a sauna as evidenced by this picture of the now fogged-up exterior door:
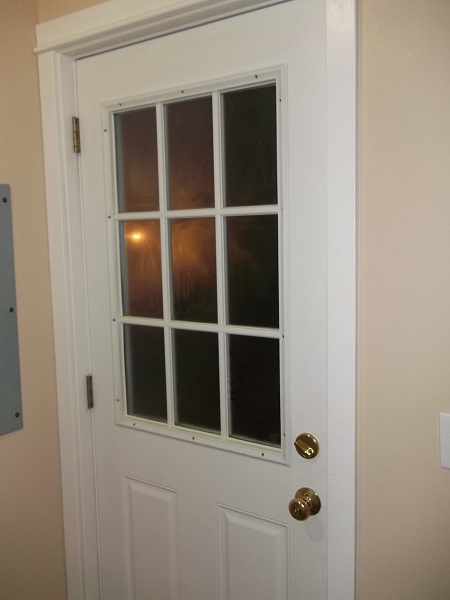
dryer-heat-keeper-2It just so happens I fogged-up the bathroom mirror something awful too as the master bath is adjacent to the laundry room. Anyway, the important question is: how well did it heat the house?

Well, the first test is how much warmer the house feels. I can attest that the laundry room is a virtual sauna. 😉 After a few more run-throughs I determined that I needed to let the dryer vent on “summer” mode for more than just a few minutes like the first time. Honestly, 15 minutes is probably best for me but I seem to let it go about 10 minutes otherwise I forget to switch the Heat Keeper to “winter” mode in order to send the dryer heat back into the house. The kitchen and bathroom (which are both adjacent to the laundry room) feel a slight bit warmer for sure. The rest of the house? Not so much.

The second–and likely more important test–is how much warmer the house thermostat registered. Sadly, I have yet to register more than a degree or two higher than the typical setting of about 64 degrees. You might think that’s not important but I suspect–only through my own subjective feelings, mind you–that this makes more of a difference than you might think.

Aside from some serious testing I couldn’t say for sure how much this Heat Keeper may be saving on our heating bill, but I figured I was literally venting this otherwise “lost” heat to the world and I was better off investing a bit of money to conserve heat that I was paying for anyway.

I have considered purchasing yet another duct vent, perhaps even one twenty feet in length, so that I could then direct the dryer heat into the major part of the house, specifically the kitchen but have yet to do so. Of course, my wife didn’t sound too happy about that plan so I doubt it will come to fruition. Ultimately, I’d say a $30 investment at most won’t break the bank and may be more useful than not.


by

Discover the 5 Minute Survival Blueprint course and get yourself prepared fast, easy, and inexpensively! It’s my gift from one prepper to another. 🙂

Comments

9 responses to “Dryer Heat Keeper: Pump the Heat Back into Your House, Save Money on Bills!”

  1. Great article! I’d forgotten about it until I read your article but I did the stocking trick when we were young and poor as well. The first time I tried using the stocking I put the drier exhaust hose in one leg and duct taped it up tight…didn’t work for very long due to rapid lint buildup.

    For round two I duct taped the waste of the stockings to the exhaust hose which gave much more surface area for the lint to attack so it didn’t clog up for several washings at which time I removed the stockings, cleaned them out and reattached.

    Keep prepping!

    1. Yeah, I’ve seen a few people recommend the simple stocking trick instead… guess I could have saved a few bucks if I’d bothered to research a bit.

  2. Mark

    This seems like a great idea; Though we have to think logically – a majority of clothes driers manufactured in previous decades vented only to inside the laundry through the mesh in the front ‘door’. Most driers now vent out through a port which you can connect ducting to, and the front door is heat resistant acrylic or glass, and you can watch your clothes tumbling. You can now choose whether to vent inside the laundry (just don’t connect a duct), or you can duct it out through the wall.

    This should lead us to think ‘why’? Why are ALL driers available with the duct area now? Most likely because there’s a few very valid reasons why you should duct the air to outside:

    Firstly the humidity. This *will* cause mold and mildew if you’re using this in a closed house (typical of when you’re using heating). Excessive moisture in the air will cause respiratory problems, though not as many respiratory problems as the mold will cause. That, in addition to compromising the structural integrity of your home if your home is built with timber framing. The extreme humidity is why so many bathrooms collapse (think the cleveland show), and why ex-marijuana-grow-houses are impossible to sell at market value, if at all. You DONT want this humidity throughout your house, even if it doesn’t *seem* excessive.

    The lint in the air will also create a lot of extra housework for you, in addition to respiratory problems. Your air conditioners will require more frequent maintenance in summer, and your PC/laptop fans and anything else with forced air+filter will require very frequent maintenance.

    I personally don’t think the fire risk is very high unless you leave dry, combustible materials around the output – though if you’re using this method to frequently supplement the heating in your house, the lint may build up in your actual heater’s filter which could indeed create a very serious fire hazard.

    This is probably more than just my 2 cents, maybe a few bucks. but there it is 😛

    1. Very interesting considerations, Mark. I can say that when I first started this a few weeks ago now I was fogging up every window in the place which made it obvious I was putting too much moisture in the air. I’ve since learned to wait about 30 minutes to get the heat dry enough to not do this. Am I still putting too much moisture into the air? Maybe. I can say that where I live now (the Pacific Northwest) it’s wet everywhere all the time. Heck, even the windows leak and let water inside!

      As for the dust problem, I don’t know if you could tell but there is a mesh screen on the Heat Keeper’s outlet to the inside of the house and I have noticed it trapping some lint which I’ve cleaned out twice now but there wasn’t much accumulation to begin with. Am I now adding more dust and lint to the house that wouldn’t otherwise have been there? Sure. Is it enough to cause trouble with my computers and even a fire hazard with my HVAC? I’d have a hard time imagining that but I obviously don’t know that… yet.

      Thus far I’m not seeing any major reasons why I shouldn’t use this. So long as I wait to use the Heat Keeper until drier air comes out and I ensure the Heat Keeper screen is clean, I feel it’s an experiment still worth continuing.

  3. Scooter

    I actually did this while I lived in Flordia…I used a nylon stocking, (AFTER momma said I coud have it), just atached it to the end of th dryer vent hose. Being in Fa, there were times when the humidity was dry and especially during winter months, This provided a moist heat and did cut the heat bill. Now I live in TN mountains, and am going to do the same thing here…I am faced wiht dry heat nd its a PITA for static electriciy…Hope it helps….

  4. cv66seabear

    My Mom taught me to do this in a much simpler fashion, and I do it every year. Yes, watch for moisture, but we have a dehumidifier to take out the excess.

    First, get an old pair of pantyhose. Cut off the legs. Undo your dryer vent from the exhaust vent. Zip strip a leg to the end of your dryer vent hose and suspend it form the wall, a door handle, whatever. The panty hose will trap excess lint, while allowing warm, moist air into your house. Close off your dryer vent. I find that a large cottage cheese tub works great, I just stick it in the vent to prevent winter from entering the house.

    We stretch the vent tube as far as possible into the house and use the ceiling fan movement to circulate air out of the area. My dryer i son the first floor, not the basement.

  5. My dryer is in the basement (with only one heater vent) so this will definitely work just fine.

  6. JAS

    These things have been around for quite a few years in one form or another. We had one several years ago and had to remove it. We started getting mold in the laundry room from all of the excess moisture it was putting into the air. I do not recommend these at all, but it you are going to use one, keep an eye on the moisture in your house. You could wind up with some serious mold issues.

    1. Yeah, I’ve been hearing the moisture could become a real problem… I really think I need to wait even longer (maybe 20 minutes or more) to cut down on the moisture output.

Leave a Reply

Your email address will not be published. Required fields are marked *