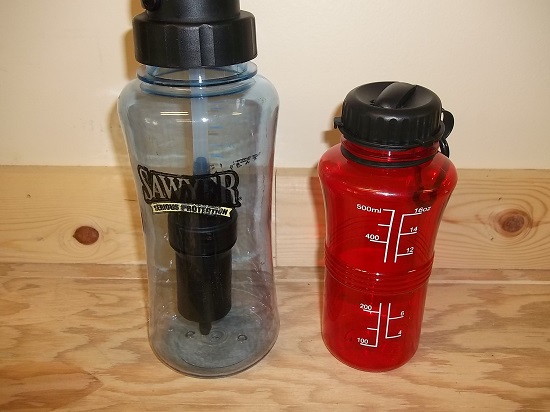
I had fun making the water bottle survival kit a few weeks back and I thought I would try one more time. This time I choose to use an old Sawyer Water Filter bottle (here’s a link to the newer version) such as this one 0n the left (as compared to the 16-ounce bottle from last time):
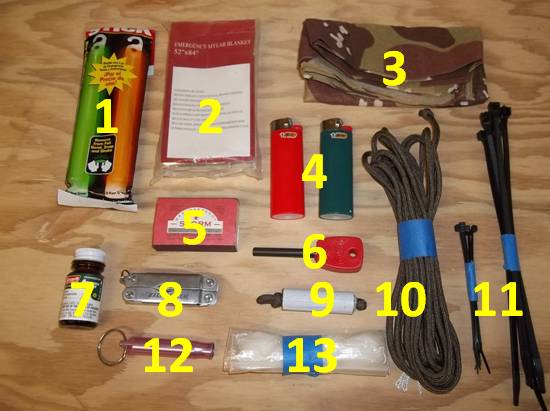
Obviously, the Sawyer bottle is much larger (at 32-ounces if I remember right). As such, I should be able to get a lot more in there but there’s one big problem: the giant water filter element in the middle! Well, it’s kind of necessary since that’s the actual water filter so it must stay. Working around the filter element, here’s what I shoved inside:
In no particular order:
- Cyalume Glow Sticks (pack of two) – I thought lighting is a bit more important than I suggested last time and since these fit well inside the bottle… in they went. The only caution is to be careful as you don’t want to accidentally snap them (thereby activating them) when placing inside.
- Emergency Mylar Blanket – Even though I absolutely despise these things I know some people swear by them and, even though I do NOT recommend them for their intended purpose, they do have other potential survival uses. That said, it was much easier to get inside than it was to get out. 😉
- Bandanna – As with last time I felt the bandanna was a good addition and so it went in here as well.
- Bic lighters x 2 – Last time I wound up adding two lighters and was only going to add one this time but they are about the easiest way for normal people to start a fire so I changed my mind again and went with two.
- Stormproof Matches – Like I said before, “if you’re going to add matches to a kit you may as well buy matches that you can rely upon.” I choose to only add one box this time around.
- Sweedish firesteel – This firesteel is easy to grasp and it fit without a problem; there are small ones if you prefer.
- Potable Aqua tabs – These don’t take up much room and it’s wise to have redundancy in a survival kit.
- Mini multi-tool – I thought about trying to add a larger multi-tool which, after this run-through now sounds like a better plan, but I wasn’t sure whether I would have been able to get them out without much trouble.
- Roll of duct tape – Again, duct tape is super useful and so the same small roll of duct tape I added last time was added here. Like before, I think it might be wise to add a slightly larger roll.
- Paracord (25′) – I realized after I wrote the last post that I didn’t include any cordage–not that I could have fit it inside–but I had room in this bottle and cordage is useful and so I added about 25 feet.
- Zip ties – like I said last time, I should have included some zip/wire ties so I did this time. They take up so little room there’s no reason not to!
- Keychain Whistle – You really only need one whistle and I choose to include the skinnier keychain whistle, though, I do prefer the Rescue Howler.
- Vaseline and cotton ball fire starters – I made these a while back and because fire-starting is so crucial to survival these will make that endeavor easier.
Unlike last time, I didn’t bother with including the Streamlight Nano flashlight (and mini USB drive) in the photo here but they are so small it wouldn’t have been a problem to add them. Also, because this water bottle had a water filter built in there was no need to include the McNett Frontier Water Filter Straw from last time.
Again, most of the basics are covered, from fire-starting to water and some gear. I like the addition of paracord, in particular, and I’d imagine somebody, somewhere, likes the mylar blanket. After thinking about it, I probably could have spent some time and wrapped the cord around the outside of the bottle thereby saving space but I wasn’t feeling THAT ambitious. 😉
Moreover, I think I would have preferred a larger multi-tool and after I’d taken these photos I found a set in one of my bags that would have worked out better than the mini multi-tool I used laste time… and I’m pretty sure I could have made the larger multi-tool fit along with everything else.
Like last time, I could have easily included other items such as a needle and some thread, safety pins, small fishing line, a compact compass and whatnot, among other small items since they could fill the cracks and crevasses.
Ultimately, these things are always a work in progress. And that is the real beauty of making your own survival kits: you can add precisely what you want so it fits YOUR needs.
Last, remember that a small survival kit like this is great for adding to a backpack, briefcase, or wherever you like since it won’t take up much room at all.


Leave a Reply