I’ve been making my own homemade yogurt for many years. Most of the time it works out great. I’ve had a few mishaps, in that the yogurt never solidifies, for whatever reason, but most of the time it works out as I expected. I’ve use a yogurt maker a long time ago, and I’ve even used an ice cooler (without any active heating) to simply keep the yogurt mixture warm, but most of the time I just use my Excalibur dehydrator to keep the temperature steady. Sadly, yogurt is about the only thing thing I ever use my dehydrator for any more.
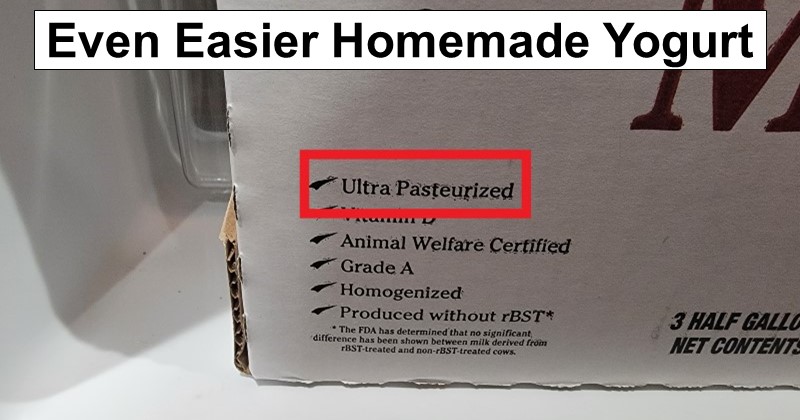
One of the biggest complaints I have when making yogurt is the time it takes to first heat the milk to 180 degrees Fahrenheit and then cool it back down to 110 degrees Fahrenheit. It takes hours, especially in the hotter summer months. Several months ago, however, I found out that I could use ultra-pasteurized milk–milk that’s been heated to at least 280 degrees Fahrenheit for at least two seconds–and NOT have to initially heat it to 180 degrees. Just look for the words “ultra-pasteurized” on the carton:
I went and looked at a different brand of milk we happened to have in the house, and that was labeled as “ultra-pasteurized” too, so maybe it’s normal? I don’t know. Anyway, since I only have to heat the ultra-pasteurized milk to 110 degrees, it saves a lot of time. Now, I only have to let my dehydrator do the work for ten or twelve hours and it’s done.
Only thing I’ve noticed, and maybe I’m just making things up in my head, but I swear it takes longer for the yogurt to solidify without traditional heating and cooling. Whereas I might have had yogurt solidify within several hours, maybe eight or nine hours at most when heating to 180 degrees and cooling, without doing this I’ve noticed it takes at least ten hours, though I tend to let the process continue for a full twelve hours.
Here’s a link to the original article I posted several years ago regarding making yogurt in the dehydrator, but all of the photos are missing for some reason. In any case, I’ll include the bulk of the recipe here for convenience:
- Start by scalding the milk in a saucepan. You do so by heating it up to 180 degrees. Do NOT allow the milk to boil! You really do need to watch the temps closely and so a simple candy thermometer is a must here. While you can use the fancy electronic thermometers if you prefer, I’ve found the glass ones work fine here. Just be sure it can measure between about 100-200 degrees Fahrenheit and you’re in business. Why scald the milk? I have no idea. Anyway, since I used a quart mason jar and because I wasn’t quite sure if this was going to work, I choose to use two cups of milk rather than the (almost) four cups that I could have fit in the mason jar; in the future I’ll do four cups.
- Once scalded, remove from heat and wait… and wait. You need the milk temperatures to be no more than 115 degrees Fahrenheit because higher temps will kill the yogurt cultures whereas temps less than 100 degrees won’t active them. I think I waited a good 10-15 minutes for the temps to get down to 115 degrees (preferably 110 degrees) and that was with stirring it off and on and even putting a small fan on it for a while. Yes, I’m THAT impatient.
- After cooling, remove about 1/2 cup of milk (I wasn’t being real scientific here) and add about one tablespoon of yogurt starter to it, stir gently so as not to kill the precious yogurt starter, return the mixture to the larger pot of milk, then gently stir again. Why you have to remove some milk first and add the culture to it I don’t know. Also, I’ve seen recommendations that were “all over the map” as to how much yogurt to use per cup of milk. It seems to me that the average recommendation is about one-half to one tablespoon per cup of milk. I’ve also read that “less is more” when it comes to making yogurt and so I opted for less.
- Now that everything is thoroughly mixed, pour the milk from the pan into the mason jar and put the lid and band on it. Now place the mason jar into the dehydrator (with the trays removed) and turn the dehydrator on to between 105-110 degrees. Leave it alone for anywhere from four to eight hours. I choose six just to be safe on either side. I should note that I also choose to turn the dehydrator ON about 5-10 minutes before placing the mason jar inside in an attempt to warm up the dehydrator. I’m not quite sure if it was worthwhile but I figured it couldn’t hurt.
- When the time is up, remove the mason jar and place it in the freezer for an hour then in the fridge for several hours or overnight. You place it in the freezer to help reduce the potential for “cottage cheese” consistency and then in the fridge to firm up. That’s it. The yogurt is made and you’re technically done. If you want to use this yogurt as a starter for next time then reserve some before adding anything to it.
A few notes:
- You can add fruit to the yogurt for taste, I did. I added about 3/4 cup (that’s a guess) of frozen mixed berries (after thawing) to about 1/2 cup (another guess) of yogurt in my blender and mixed it up a bit. Then I added that mixture back to the mason jar yogurt and gave it several good stirs. Honestly, I could have added more.
- The only other addition I would include is something to sweeten the yogurt a bit after having dished it up. I found honey works well for me but I happen to like honey in all sorts of things. I’d imagine Agave Nectar works well and maple syrup probably does too. Of course, it all depends on how you prefer your yogurt.
- Remember to reserve a tablespoon or two BEFORE adding any fruit or sweetener if you want to use it as the starter next time.
- If the yogurt is too runny try adding some gelatin or make use of it otherwise, such as in a smoothie. Try again a few times varying amount of yogurt used and incubation time. I know the first time I made this it was more like Kiefer, something akin to thick milk. I added a few gelatin packets to firm things up but it still wasn’t quite like the thick Greek-style I’m accustomed to.
A few precautions:
- It’s possible to get the milk both too hot and too cold for the yogurt culture. Between 100-115 degrees Fahrenheit is what you want with 110 degrees Fahrenheit being about the sweet spot.
- Try to use fresh yogurt since yogurt that is too old (let’s say a few weeks or longer) may not prove to be a good starter.
- Whole milk is preferred for some reason, though, I’ve read skim milk can be used if thickened with gelatin.
Leave a Reply