
First, let me state that I’m not a big fan of using candles for much of anything during an emergency situation. I think they’re a significant fire hazard especially after a disaster when people do dumb things… possibly like this. There are better, safer ways to light up the night and cook food during an emergency.
That said, a week or so ago I read this post that Bev at SeasonedCitizenPrepper.com put up about makeshifting a tea light-powered oven with an old toaster oven. Well, since I happen to have a toaster oven I figured I would give it a shot myself. Here’s what happened (click images to enlarge and follow along below)…


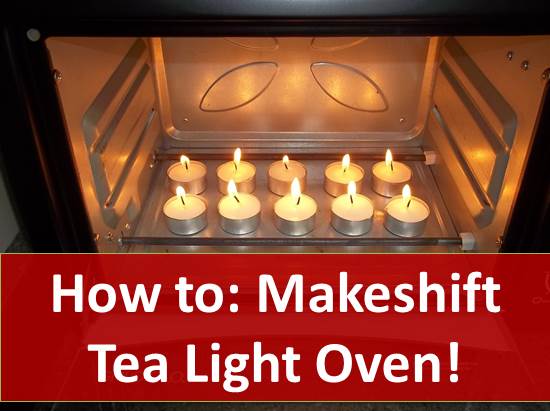
- As I had no idea what to expect I figured I would try one tea light at a time to see how the temperature changed. Eventually, I figured out that I needed three tea lights to register a useful temperature and about five tea lights got above 225F.
- To get to 350F I needed only eight tea lights which was less than I expected and since I had made some banana bread to bake (that’s next week) I figured I would put one of the three loaves in this makeshift oven to see what happens. Well, it didn’t work out quite as well as I had hoped but this was a learning experience for me as I’ve never attempted a candle-powered oven before.
- I moved the grate down so I could fit the loaf pan in the oven and walked away. To my dismay, I found the temperature in the stove had dropped to about 250F. A few minutes later I realized that a few of the tea lights in the back had gone out. What happened? Long story short, the candles were starved for oxygen… well, duh!
- Since I didn’t want to prop the door open more than necessary and let too much heat out I ended up sticking a fork in it… literally between the door and oven body (click image four to see). I also found that, over the course of about 30 minutes, even doubling the number of candles to 16 wasn’t enough to get the temps back to 350F. I was having trouble keeping two candles lit and just gave up since the temps were over 300 and closed in at 325 at times. Then, my hour of bake time was almost up when…
- I smelled something burning. “What was that!?” I said to nobody in particular. Oh shit, the stoves on fire! Once I realized I wasn’t in immediate danger of burning the house down, I pulled out the bread in order to salvage it and grabbed my camera to take a picture, after all, wouldn’t you? It seems to me that three of the tea lights combined forces and got a bit out of control. No big deal as I just smothered them with the small baking pan that came with the oven.
- I then decided to move the oven outside to let it air out and hope that it’s not ruined because my wife would NOT be happy with me. Fortunately, my life is spared for another day as the oven is fine. Just don’t tell my wife what happened. 🙂
I think I’ve learned a few lessons here:
- Don’t mess with candles, kids, they’re a fire hazard! If you’re going to use them then do so in a controlled environment, with an adult present, preferably not me.
- Try stuff before you expect to rely on it… always. This is especially true of makeshift ideas such as this one.
- If you’re going to make your own tea light oven then you probably need something to keep them from co-mingling and ruining your food as well as your day. I’m not quite sure what that would be yet.
- It’s a good thing I didn’t try larger candles in our big oven. 😉
As for the bread? It didn’t turn out half bad after I cooked it an additional 20 minutes (beyond the called for one hour) in the big oven at 350… and cut off the burned bottom… and a bit of the sides! I should note that it was a big lopsided but it all went down the same as far as I was concerned.
What about you? Even try a candle-powered oven before?
Leave a Reply to Larry Pierce Cancel reply